In this post I am going to show how to create a Continuous Integration and Continuous Delivery pipeline in Azure DevOps for your PaaS – Azure App Service. The whole process is for a .NET Core Web API. However, Azure DevOps let’s you create this kind of process for multiple platforms. Plus, in Azure you can host .NET Core applications among a wide range of many other platform applications.
This is the Part I of II posts about this topic. I realized that in order to be clear, concise and accurate about a broad topic, it deserves two blog post. Plus, I have not realized how much work this requires. I did all this implementation but never measures the time spent.
Azure DevOps
Azure DevOps is a multi-purposes platform that is aimed to help IT teams, especially software development teams, to develop and maintain the whole development-process-life-cycle. Formally known as Visual Studio Team Services and Team Foundation Service Online, it has many capabilities such as: git repo, continuous integration and continuous delivery engine, kanban boards and planning, and so on. Azure DevOps is the platform selected for this CI/CD process.
ASP.NET Core Web API project
Our solution is a ASP.NET Core Web API that has the following structure:
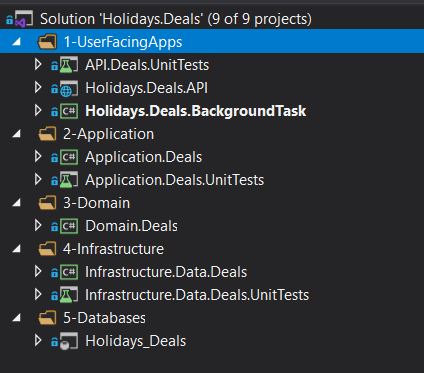
It has a Web API, a console app for a WebJob, Domain, Application and Infrastructure Layers and finally a Azure SQL Database.
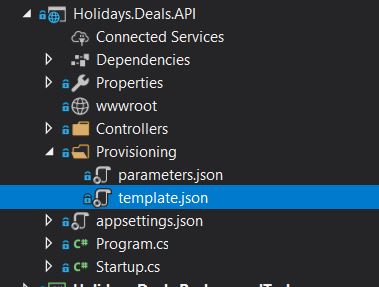
As I am looking for applying an Infrastructure as Code in my CI/CD pipelines and DevOps approach, I have decided to include the Azure ARM templates and parameters to create the Azure required resources on the fly for my solution. Here, you will see a “Provisioning” folder with a couple of files for my Azure ARM templates (in another post I will explain how to create/customize your Azure ARM templates):
Kicking off the work
We have to go through the following steps in order to achieve the work:
- Create a Azure DevOps account: There is a free version available to anyone. Just go here: Azure DevOps.
- Create a new project: On the right top corner, you will find a blue “New Project” button. Then, you will need to fill out the following form (on the advance section, you must select your version control – git for this example – and your work item process – in this case agile):

Once you finish the project creation, you will have access to the Repo, Pipelines, Boards and Test Plans. You can create your own repo. For this example, let’s keep the default Repo.
- Clone the git repo to your local computer: Then, you can create your .NET Core solution. Implement the required functionality and push your changes.
- Create your default-template pipeline: Go to “Pipelines” in order to create a Continuous Integration pipeline. The, click in “Create Pipeline”. On the next screen, we need to look for “Use the classic editor” option (this is for simplicity on the creation of the CI pipeline, soon I will do it using yaml files). On the “select source” tab, we must select “Azure Repos Git”, pick the default created repo and select the master branch. In the template section, search “.NET Core” and apply the template. Azure DevOps will set up all basic-required CI steps to build your ASP.NET Core solution.
Improving the steps on the CI pipeline
So far, we have created a Azure DevOps account, a new project inside it, clone the git repo and create a Continuous Integration pipeline based on the default template. We must customize the CI pipeline steps a little for our purposes. In this case, I want to deploy the Azure SQL database as well as the infrastructure as code resources. Hence, I must do the following steps:
- Restore step: We must tell this step that the “Path to project” is where our Web API project resides. In this case “**/Holidays.Deals.*.csproj”.
- Build step: As before, we must indicate the path of project as well as setting up the argument to “–configuration $(BuildConfiguration)”.
- Build database project: Since we have decided to deploy the database automatically through the pipeline, we must build the project to produce the .dacpac file. This is done through a MS Build step.
- Test: This step run all unit tests developed in the solution. It takes all projects that follows this pattern in its project name: “**/*Tests/*.csproj”.
- Publish test results: Previous step just produces a .trx file with all test results. Now, we need to publish that file, so Azure DevOps can produce a visual report that shows the test results. In this step you must select “VSTest” for “Test result format”, “**\*.trx” for “Tests results files”, check “Merge test results” and “Upload test results files”.
- Publish: This step is required by dotnet core as a build step. Point the “Path to project” to the Web API project.
- Publish a background task: This solution includes a project to run a webjob. This step is to build that background task project.
- Copy provisioning files: This step is critical for our infrastructure as code approach. This step looks for .json files in the “Provisioning” folder and copy them up to a specified path. In the content, set “**\*.json”. You ask the creation of a specific folder for this files in the same directory where the solution is going to be placed.
- Copy SQL Dacpac file: This step copies the dacpac file produced previously to a folder in the same directory where the solution is going to be placed. It our case, it seeks for “**\*.dacpac” content.
- Public artifacts: Finally, this step copy the whole artifacts into a folder. You must select “Azure Pipelines” as “Artifacts publish location”.
Your steps must looks pretty much like this:

Final steps on your Continuous Integration pipeline
You are almost there. You only need a couple of final steps to get your Continuous Integration pipeline done.
- Enable Continuous Integration: You must go to “Triggers” and enable the option “Enable continuous integration” as bellow:

- Finally, you can set a meaningful name/number for your builds. This is something not required but it depends on your preferences. It is up to you. Either way, here is how you can customize it in the “Options” section:

And that is. From now on, every time a developer commit his/her changes, this Continuous Integration pipeline will do all steps set up in order to ensure that the artifacts are good to move forward to the phase, the continuous delivery process, something I will address in a my next post.
